How to prepare before installation, from checking for leaks to following building codes.
The main types of vapor barriers, their pros and cons, and how to choose the right one for your climate and building materials.
Signs that show your home needs a vapor barrier before serious damage happens.
The difference between a vapor barrier and a vapor retarder, with real-life examples.
Step-by-step details of the installation process, common mistakes to avoid, and tools needed.
The cost of vapor barrier installation and why professional work is often the smarter choice than DIY.
Tips on maintenance so your vapor barrier lasts for many years.
By the end of this article, you will understand how vapor barriers work, how they protect your home, and why hiring an experienced team like Pure Eco Inc. is the best way to ensure long-term results.
Why is vapor barrier installation important?
When it comes to protecting your home from moisture damage, mold growth, and energy loss, vapor barriers play a crucial role. Acting as a protective shield, these barriers effectively prevent the infiltration of moisture and its negative effects on your property.
This article provides you with a clear understanding of what vapor barriers are, how they work, and the numerous benefits they offer to improve your living space.
How Vapor Barriers Work
Vapor barriers are specialized materials that serve a vital role in controlling the flow of moisture vapor. They are strategically placed in various areas of a building, such as walls, floors, attics, and ceilings, with the primary objective of impeding the movement of water vapor from one side to the other.
To gain a better understanding of vapor barriers, let’s delve into the fascinating science of moisture diffusion. Moisture naturally travels from regions with high humidity to those with lower humidity, and this flow can happen in either direction. Within a building, moisture typically migrates from the warm and humid interior to the cooler and drier exterior in colder months. Conversely, during warmer months, it moves in the opposite direction.
Vapor barriers play a crucial role in protecting your home by creating a strong barrier that effectively resists the passage of moisture-laden air. Their primary function is to limit the movement of water vapor, which helps prevent excessive moisture from infiltrating the building envelope. This important protective measure shields your home from potential damage caused by moisture, including issues like rotting wood, structural deterioration, and the growth of mold and mildew.
Where Vapor Barriers Are Most Effective
A vapor barrier is most useful in places where moisture can easily enter your home. From my years of work, I see the same problem areas again and again:
Crawl spaces – These areas often let ground moisture move into the house. A vapor barrier on the floor and walls can keep the space dry and protect the rest of the home.
Basements – Because they sit under the ground, basements collect a lot of humidity. A vapor barrier helps protect the foundation walls and keeps the air healthier.
Attics– Warm air inside the home often meets the cold roof deck and creates condensation. A vapor barrier in the attic reduces this risk.
Bathrooms and kitchens – Daily activities like cooking and showers add a lot of indoor humidity. Barriers in walls or floors can help control this moisture.
Exterior walls – In cold climates, warm indoor air meets cold outside walls. Without a barrier, this can cause condensation inside the wall and lead to mold or wood damage.
Expert Quote from Pure Eco Inc.: “In our projects across California, we often see crawl spaces, basements, and attics as the biggest problem areas. That’s where a vapor barrier makes the most difference. When we install it in these key places, homeowners notice cleaner air, lower bills, and fewer problems with mold or wood damage.” – Senior Technician, Pure Eco In
Preparation for Vapor Barrier installation
In order to achieve effective and long-lasting protection against moisture, carry out proper pre-installation preparation before you install vapor barriers. We will guide you through the essential steps involved in pre-installation preparation, which encompass assessing moisture sources, inspecting existing conditions, and familiarizing yourself with building codes and regulations.
1. Assessing Moisture Sources
To begin the pre-installation process, identify first any potential moisture sources within the structure. Moisture infiltration can occur through various pathways, and understanding these sources will help determine the most effective placement of vapor barriers. Common areas of concern include basements, crawl spaces, attics, and areas prone to water leaks or condensation.
By identifying and addressing these moisture sources, you can prevent further moisture-related issues and ensure that your vapor barrier installation will be effective in controlling moisture movement.
2. Inspecting Existing Conditions
Before installing vapor barriers, evaluate the existing condition of the building envelope, including walls, floors, ceilings, and drainage. Conduct a thorough inspection to identify any signs of existing moisture damage or issues that could compromise the effectiveness of the vapor barriers.
Address any pre-existing moisture issues or damage before proceeding with the installation. Repairing leaks, fixing damaged insulation, and addressing mold or mildew growth will help create a solid foundation for the vapor barrier installation and ensure optimal performance. The floor and wall surfaces should be clean and dry before installing a vapor barrier.
3. Understanding Building Codes and Regulations
Familiarize yourself with local building codes and regulations related to vapor barrier installation to ensure compliance, safety, and adherence to standards. Building codes may specify requirements regarding the types of vapor barriers to be used, installation methods, and other related considerations.
By understanding and following these regulations, you can ensure that your vapor barrier installation meets the required standards. This will both provide maximum protection against moisture and let you comply with legal requirements.
Proper pre-installation preparation is a crucial step in ensuring the effectiveness of vapor barrier installation. By assessing moisture sources, inspecting existing conditions, and understanding building codes and regulations, you lay the foundation for a successful vapor barrier installation that will safeguard your home from moisture-related issues.
While it may seem easier to simply jump in and start installing your vapor barrier, taking the time to identify and address moisture sources, evaluate existing conditions, and comply with building codes, lets you create a robust and durable moisture control system. This will result in long-term benefits for your home, including improved indoor air quality, enhanced energy efficiency, and increased structural integrity.
Signs Your Home Needs a Vapor Barrier
Many homeowners only think about a vapor barrier after problems appear. But if you know the early signs, you can stop damage before it gets worse. Look for these warnings:
Water drops on windows or walls – This means there is too much moisture inside your home.
Bad, musty smell in crawl spaces or basements – Often this smell comes from mold that grows when air is too damp.
Wood that looks bent, soft, or rotten – Moisture is already harming your floors, walls, or beams.
Mold or mildew on surfaces – A clear sign that moisture is trapped and spreading.
If you notice any of these, it is a good time to install a vapor barrier. Acting early can save money, protect your home, and keep the air healthier for your family.
“When I visit homes with mold or damaged wood, I often see that a vapor barrier could have stopped the problem years earlier. Installing it before damage starts is always cheaper and safer than fixing moisture problems later.” – Senior Vapor Barrier Technician with 15+ years of experience.
How to Choose the Right Vapor Barrier
To ensure effective moisture control in your building, choose the appropriate vapor barrier. We have outlined factors that you should consider when selecting a vapor barrier, including climate measurement, humidity control strategy, and compatibility with building materials.
Climate Considerations
The climate in your region plays a significant role in determining the most suitable vapor barrier for your project. Different climates have varying levels of humidity and temperature fluctuations, which can impact moisture movement within the building envelope.
In humid climates, where moisture infiltration is a common issue, you may prefer to install a vapor barrier with a higher permeability rating. This allows some moisture to escape, thus preventing condensation and potential damage. On the other hand, in colder climates where temperature differentials between the interior and exterior are more significant, a vapor barrier with a lower permeability rating may be better as this helps prevent moisture from entering the building.
Understanding the specific characteristics of your climate will guide you in choosing the appropriate vapor barrier material and determining its permeability rating to effectively control moisture.
Moisture Control Strategy
The choice of vapor barrier type and installation method will also be influenced by the moisture control goals for your building. Consider whether your primary objective is to prevent moisture intrusion from the outside or to control moisture generated from indoor activities.
For buildings in areas prone to heavy rain or high groundwater levels, it may be necessary to install a plastic vapor barrier with excellent water resistance and a robust installation method, such as a fully adhered system.
In spaces where moisture generation from within the building is a concern, such as bathrooms or kitchens in high-humidity areas, a vapor barrier with good vapor diffusion properties can help effectively regulate moisture levels.
A crawl space vapor barrier can prevent soil/ground moisture and crawl space moisture problems like mold. Crawl space encapsulation cuts heating and cooling costs and keeps pests away.
By understanding your moisture control strategy, you can select a vapor barrier that aligns with your specific needs and ensures effective moisture management.
Compatibility with Building Materials
When you are selecting a vapor barrier, always take into account its compatibility with other building materials. Various vapor barrier materials may interact with insulation, framing, and finishes in different ways, potentially affecting the overall performance and lifespan of the vapor barrier system.
To ensure smooth integration with your existing or planned building materials, select a compatible vapor barrier. Consider important factors like adhesion, fastening methods, and potential chemical reactions. For instance, if you’re using spray foam insulation, choose a vapor barrier specifically designed for use with spray foam to prevent any compatibility issues.
By considering these factors, you can confidently make an informed decision and select a vapor barrier that will effectively safeguard your building against problems caused by moisture.
Types of Vapor Barriers
Vapor barriers play a crucial role in maintaining a healthy moisture balance within your home. These barriers, which can be made of materials like polyethylene, foil, or spray foam, are strategically placed within the building. Their purpose is to prevent the movement of moisture by acting as a barrier, limiting the transfer of water vapor between different areas. By impeding the diffusion of moisture, vapor barriers effectively protect your home from the potential damage caused by excessive humidity and condensation.
To make an informed decision for your project, you must first understand the various types of vapor barriers along with their respective advantages and disadvantages. Let’s explore the different options available:
Polyethylene Vapor Barriers
Polyethylene vapor barriers are among the most common and widely used types of vapor barrier materials. They consist of durable plastic sheeting, typically made of high-density polyethylene (HDPE) or low-density polyethylene (LDPE).
Polyethylene vapor barriers are known for their excellent moisture resistance. They come in different thicknesses, ranging from 4 mils to 15 mils, providing varying levels of protection against moisture diffusion. This flexibility allows them to be used in various areas of a building, including walls, floors, and ceilings.
Foil Vapor Barriers
Foil vapor barriers, also known as reflective insulation, are another type of vapor barrier that offers unique properties. These barriers are made of a reflective aluminum foil layer laminated to other materials, such as polyethylene or kraft paper.
Foil vapor barriers are known for their exceptional reflective properties. These barriers are specifically designed to reflect radiant heat and prevent the transfer of moisture-laden air.
They find widespread usage in applications where controlling heat gain or loss is important, such as in attics or in regions characterized by hot summers and cold winters.
Spray Foam Vapor Barriers
Spray foam is a versatile insulation material that can also serve as a vapor barrier. It is applied as a liquid, expanding and solidifying into a foam that provides both insulation and moisture control.
Pros and Cons of Each Type
Each type of vapor barrier has its own advantages and disadvantages:
Type
Advantages:
Disadvantages:
Polyethylene Vapor Barriers
Cost-effective: Polyethylene vapor barriers are relatively affordable compared to other types of barriers, making them a popular choice for both residential and commercial applications.
Easy installation: They are typically available in rolls, making them easy to handle and install. They can be secured with adhesive or mechanical fasteners.
Versatility: Polyethylene vapor barriers can be used in different climatic conditions and are suitable for both warm and cold climates.
Vulnerable to punctures: Polyethylene barriers can be punctured during installation or construction activities, compromising their effectiveness. Extra care must be taken to avoid accidental damage.
Limited durability: Over time, polyethylene vapor barriers may degrade or become brittle, particularly if exposed to direct sunlight or extreme temperature fluctuations.
Foil Vapor Barriers
Excellent thermal performance: Foil barriers reflect radiant heat, helping to maintain a more comfortable indoor temperature and reducing energy consumption.
Improved insulation: When combined with other insulation materials, foil barriers can enhance the overall insulation performance of a building envelope.
Resistance to mold and mildew: Foil barriers don’t provide a suitable environment for mold growth, contributing to healthier indoor air quality.
Limited moisture resistance: Foil barriers are more effective at blocking radiant heat than controlling moisture diffusion. They may not be as effective in areas with high humidity or moisture infiltration.
Vulnerability to damage: Foil barriers can be easily torn or punctured during installation or maintenance activities, requiring careful handling and protection.
Spray Foam Vapor Barriers
Spray foam acts as an insulation and air-sealing material, effectively reducing heat transfer and preventing moisture intrusion. When applied correctly, it can create a continuous and seamless vapor barrier, eliminating gaps and minimizing the risk of moisture-related issues
Professional installation: Spray foam vapor barriers are typically installed by trained professionals due to the specialized equipment and expertise required for the job.
Compatibility with other materials: It is essential to ensure compatibility between spray foam and other building materials.
By selecting a vapor barrier that works well with your building materials, you can ensure seamless integration of the system and optimize its moisture control effectiveness.
Benefits of Vapor Barrier Installation Beyond Moisture Control
Many people think a vapor barrier only stops moisture, but the truth is, it does much more. When your home is protected with a proper barrier, the air you breathe becomes cleaner because mold spores and allergens have less chance to spread. Your insulation also lasts longer, since it stays dry and can do its job better. This makes the whole house more energy efficient.
Another benefit is the value of your property. Homes with good moisture protection are safer, healthier, and more attractive to buyers, which can help if you decide to sell in the future. A well-installed vapor barrier also reduces pest problems. By sealing crawl spaces and other hidden areas, you remove easy entry points for insects and rodents.
Finally, you will notice the comfort. The air feels more stable, humidity is easier to control, and drafts are reduced. This creates a healthier, quieter, and more pleasant living space for you and your family.
“When I explain vapor barriers to clients, I always say it’s not just about stopping water. It’s about better air, better comfort, and a stronger home. A good installation protects your house now and also adds value for the future.” – Beni, Senior Technician, Pure Eco Inc.
Vapor Barrier vs. Vapor Retarder – What’s the Difference?
It is easy to mix up vapor barriers and vapor retarders because both are used for moisture control, but they work in different ways. A vapor barrier is made to stop almost all water vapor from moving through walls, floors, or ceilings. It is like putting up a solid shield that blocks moisture completely.
A vapor retarder is different. Instead of blocking all moisture, it slows the movement down. Some vapor can still pass, but at a much lower level. This is often useful in homes that need a balance, where you want to reduce moisture but still allow the structure to breathe a little.
Which one is best for your home depends on your climate, building design, and how much humidity you deal with daily. Cold climates often need a full barrier, while in mixed or humid areas a retarder can work better.
Real-Life Examples. In one project in Los Angeles, we installed a vapor barrier in a crawl space where the soil stayed wet all year. Without a strong barrier, the wood beams would have rotted in just a few years. In another case, a family in coastal California had problems with peeling paint inside their walls. Instead of a full barrier, we used a vapor retarder so the walls could still breathe. This kept moisture levels under control without trapping damp air inside.
“I always explain it like this: a barrier closes the door to moisture, while a retarder keeps the door half open. Both can be right, but only if used in the correct place. That is why checking your home conditions first is so important.” – Beni, Senior Technician, Pure Eco Inc.
Vapor Barrier Installation Process
Proper installation is essential for vapor barriers to be effective in controlling moisture. We will outline the step-by-step process for vapor barrier installation, covering surface preparation, vapor barrier placement, and the necessary tools and equipment.
1. Surface Preparation
Before installing the vapor barrier, prepare the surfaces properly to ensure optimal adhesion and performance.
Start by thoroughly cleaning it where the vapor barrier will be installed. Remove any dirt, dust, debris, or loose materials that could interfere with proper adhesion.
Next, inspect the surfaces for any damage, such as cracks or holes. Repair these areas using suitable materials and techniques to create a smooth and solid surface for the vapor barrier installation.
2. Vapor Barrier Placement
Once the surfaces are prepared, proceed with the actual installation of the vapor barrier. The specific steps may vary depending on the type of vapor barrier chosen, but the following guidelines generally apply.
First, measure and cut the vapor barrier material according to the dimensions of the area to be covered, leaving an adequate overlap for seams and edges.
Start the installation by positioning the vapor barrier at the lowest point of the installation area and work your way up. Smoothly unroll or unfold the material, ensuring it covers the designated area entirely.
Use appropriate sealing methods, such as butyl tape or adhesive, to securely seal any seams or overlaps in the vapor barrier. This creates a continuous barrier that prevents moisture from infiltrating through gaps.
Pay special attention to areas with penetrations, such as pipes, vents, or electrical outlets. Use compatible sealants or gaskets to ensure a tight seal around these penetrations, effectively blocking moisture entry points.
Tools and Equipment Required
To successfully install vapor barriers, you will need the following tools and equipment:
Utility knife or scissors: Used for cutting the vapor barrier material to the desired size.
Tape or adhesive: Necessary for sealing seams and overlaps, thus ensuring a watertight barrier.
Staple guns or fasteners: Used to secure the vapor barrier material to the surfaces, thus providing proper attachment and stability.
Sealants or gaskets: Required to seal penetrations and ensure a tight seal around pipes, vents, or other openings.
Common Mistakes to Avoid
A common mistake is not covering the entire area that requires protection. Leaving gaps or exposed surfaces can allow moisture to bypass the vapor barrier, which may lead to moisture damage. Ensure that the vapor barrier is installed thoroughly and covers all relevant surfaces.
Improper overlapping of vapor barrier sections can compromise the continuity of the barrier as well. Follow the manufacturer’s instructions for overlapping guidelines to ensure a proper seal and prevent moisture infiltration.
Also, placing the vapor barrier on the wrong side of the insulation can disrupt the moisture control mechanism. Ensure that the vapor barrier is placed on the warm side of the insulation to prevent condensation and moisture accumulation.
Once you are finished, you must inspect the barrier regularly to identify any signs of damage or deterioration in the vapor barrier. Check for any punctures, tears, or areas where the barrier may have become detached. If any damage or deterioration is detected, promptly repair or replace the affected areas. Neglecting repairs can compromise the effectiveness of the vapor barrier and lead to moisture-related problems.
During your inspections, you may notice that debris such as dust, dirt, or insulation fibers has accumulated over time on the surface of the vapor barrier, reducing its performance. Regularly clean the vapor barrier to remove any debris and maintain its functionality.
Any changes in the building’s structure, such as renovations or modifications, may require adjustments or additions to the vapor barrier. Stay attentive to these changes and consult with professionals to ensure the vapor barrier remains properly installed and effective.
By avoiding these mistakes and prioritizing maintenance, you can protect your building from potential moisture-related problems and maintain a healthy indoor environment.
Cost of Vapor Barrier Installation
The cost of installing a vapor barrier can be very different from one home to another. It depends on how big the area is, what type of material is used, and how much labor is needed. For example, a small crawl space project may start around $1,200, while larger crawl spaces with thicker material can cost closer to $4,000. A basement system is usually more expensive because it covers a bigger space and may need stronger protection. These projects often range between $2,000 and $6,000.
For whole-house vapor control, where many areas need to be sealed, the price can go above $7,500. While some homeowners try using simple plastic sheeting as a do-it-yourself option, it usually does not last long and can easily tear. Professional installation may cost more at first, but it ensures the barrier is placed correctly, sealed tightly, and gives you years of protection.
“I always tell my clients that a vapor barrier is an investment, not just an expense. If it is done right the first time, you avoid future repairs for mold, damaged wood, or wet insulation. In the long run, professional work always saves money.” – Senior Technician, Pure Eco Inc.
DIY vs. Professional Vapor Barrier Installation
Some homeowners think about installing a vapor barrier themselves to save money. A DIY job can work for very small areas, like part of a crawl space, but it is not always simple. If the barrier is not sealed tightly, or if it is placed on the wrong side of the insulation, it will not protect the home. There is also a risk of not meeting local building codes, which can cause problems later when selling the house or making repairs.
Professional installation may cost more, but it comes with important benefits. A trained team uses stronger materials, follows all building rules, and knows how to seal every gap, corner, and pipe. This gives you a system that works for many years without worry.
“I’ve seen many DIY jobs fail after just a short time because the barrier was not sealed the right way. When our team installs it, we make sure it is done once and done right. That means long-term protection and peace of mind for the homeowner.” – Senior Technician, Pure Eco Inc.
Maintenance Tips for Long-Term Performance
A vapor barrier installation is not a one-time job. To keep it effective, you need to care for it over the years. Here are simple steps that help your vapor barrier last longer and keep protecting your home:
Do yearly inspections – check the vapor barrier for holes, tears, or loose edges that may let moisture in.
Watch the moisture level – use a hygrometer in crawl spaces or basements to make sure humidity stays low after vapor barrier installation.
Repair problems quickly – if you see damage, patch or reseal the vapor barrier right away to stop bigger issues.
Keep water away from the house – good drainage and clean gutters reduce the stress on your vapor barrier system.
Avoid heavy traffic – do not drag tools, boxes, or sharp objects across the vapor barrier, as this can cause punctures.
“A strong vapor barrier installation can protect a home for decades, but it must be inspected and maintained. Small repairs today save you from big moisture problems tomorrow.” – Beni, Senior Technician, Pure Eco Inc.
Contact Pure Eco Inc
Seeking professional assistance will help you achieve a successful vapor barrier installation, protect your building from moisture-related issues, and create a comfortable and healthy environment for occupants.
Contact us today for additional information on space vapor barriers and to learn more about all of our premier services!
How do you install a vapor barrier in a crawl space?
To install a vapor barrier in a crawl space, the surface must be cleaned and dried first. The material is rolled out, cut to fit, and sealed tightly at all seams and edges with tape or adhesive. Extra care is taken to seal around pipes, vents, and other openings.
Should the vapor barrier go on the warm side or the cold side of the insulation?
In most cases, the vapor barrier is placed on the warm side of the insulation. This keeps warm, moist air from reaching colder surfaces where condensation could form. The correct placement can change based on climate, so it is best to check with a professional.
What tools are needed for vapor barrier installation?
Common tools include a utility knife or scissors to cut the material, tape or adhesive to seal the seams, and a staple gun or fasteners to attach it. Sealants or gaskets are also used to close gaps around pipes, vents, or wiring.
Can I install a vapor barrier myself?
DIY installation is possible in smaller areas, but many homeowners find it hard to seal everything correctly. Gaps or loose seams can cause the barrier to fail. Professional vapor barrier installation ensures the work is done properly and lasts for years.
How do I avoid mistakes during vapor barrier installation?
The most common mistakes are leaving gaps, not overlapping sheets enough, or putting the barrier on the wrong side of the insulation. Following manufacturer’s instructions and sealing every edge is important. Professionals know how to avoid these problems and make the system reliable.
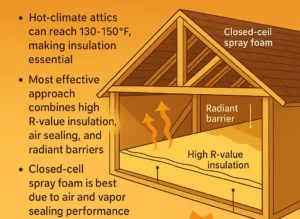
Key Takeaways Hot-climate attics can reach 130–150°F, making insulation essential to keep heat out and improve overall indoor air quality. The most effective approach combines
A Homeowner’s Guide to Reducing Neighbor Noise Indoors and Outdoors Noise from neighbors can undermine your overall quality of life. And although many online ideas
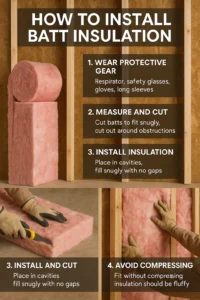
A Homeowner’s Guide to Installing Batt Insulation Correctly One of the most straightforward ways to improve your home’s thermal performance is to install batt insulation.