
Key Takeaways for a Successful AC Installation
- Proper preparation is important for smooth and safe installation.
- Choosing the right type of AC (window, split, or central) depends on your room size, energy needs, and budget.
- Window units are simple to set up but best for single rooms.
- STplit systems require careful work with mounting, piping, wiring, and refrigerant charging.
- Always follow safety steps: measure correctly, clean the area, seal gaps, and check airflow.
- Professional installation ensures correct setup, efficiency, and long-term reliability.
- Pure Eco Inc. offers expert help with choosing, maintaining, and installing your AC, and backs this service with a warranty and free consultation.
Proper Planning for Successful AC Installation
Proper preparation is crucial to ensure a smooth and efficient air conditioner installation. Choosing the appropriate one for your space is the first and most critical step in the installation process.
“Give me six hours to chop down a tree and I will spend the first four sharpening the axe.” – Abraham Lincoln
Choosing the Right Air Conditioner
The right air conditioner is essential for optimal cooling and energy efficiency in your home. There are many types, from window units for single rooms to split systems for multiple cooling and central AC for whole-house solutions. Which one do you need? Understanding will help you tailor the system to your specific needs. Also, consider factors such as room size, energy efficiency, and budget to pick the AC that fulfills your expectations and provides the right balance between long-term savings and comfort.
Given the complexity and importance of proper installation, it is often best to entrust this work to a specialist to ensure optimal performance and safety, where precise setup and meticulous attention to detail are crucial for long-term efficiency and reliability. Would you like a professional to handle the whole process? Our HVAC experts can not only help you choose an air conditioner that best meets your needs and budget but also provide a professional AC installation service, with a full warranty.

Get Free Estimate!
Request Your Home Comfort Estimate
Installing a Window Air Conditioner |
Installing a Split System Air Conditioner |
|
|
Since there are many air conditioning units, the installation process depends on the type of AC unit you have chosen. To make things simpler, we will explain the process for each type of AC. Even if you are not installing it yourself, our guide can help you track the technician installing your unit.
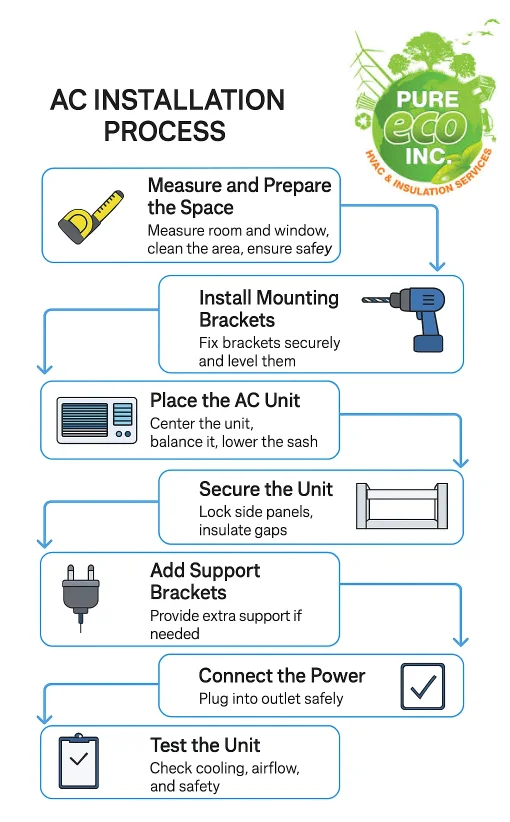
How to install a Window Air Conditioner
1. Measure and Prepare the Window
The first thing to do is to measure the room size so that you have the right AC that will cool your room efficiently and effortlessly. Also, check the dimensions of the window to confirm that the air conditioner will fit securely.
Next, turn off the power in the installation area and wear appropriate protective gear such as gloves and safety glasses to prevent any accidents or injuries. Prepare the window area, remove any obstacles or window screens, and clean the window sill and surrounding area to create a clean and debris-free surface.
2. Install the Mounting Brackets
Read the manufacturer’s instructions and use a level to guarantee the brackets are straight so that the AC sits properly without tilting.
3. Place the Air Conditioner Unit
Center and balance the unit within the window opening. Lower the window sash behind the top flange of the air conditioner to secure it in place. The AC should be stable.
An AC unit can be heavy, so ask for help if you can’t lift it safely on your own!
4. Secure the Unit
Extend and secure the accordion-style side panels to fill the gaps on either side of the air conditioner. Use screws to attach the panels securely to the window frame.
Add insulation with foam insulation strips around the window to seal any gaps and prevent air leaks. This improves the unit’s efficiency and helps it perform better.
5. Install the Support Brackets
Check if your air conditioner model requires additional support beneath it.
If so, follow the manufacturer’s instructions to attach these brackets securely to the designated areas.
6. Connect the Power
Plug the unit into a nearby electrical outlet. If needed, use an extension cord rated for air conditioners to reach the outlet.
Make sure the power cord is securely positioned to prevent interference with the window operation and is safely out of the way to avoid any potential hazards.
7. Test the Unit
It’s now time to test the unit. Turn on the air conditioner and set it to the temperature you want. Check its operation closely to confirm it cools the room as expected. Also, test all new features to familiarize yourself with the functionalities. Finally, check for any leaks around the unit.
Get Free Estimate!
Request Your Home Comfort Estimate
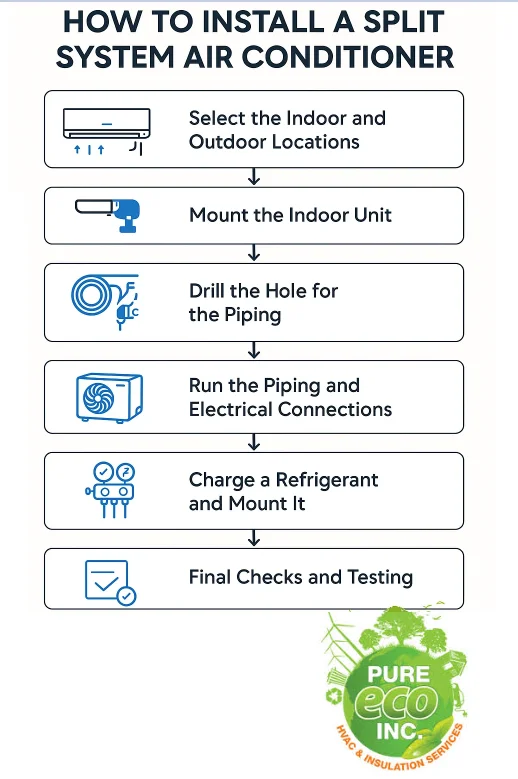
How to install a Split System Air Conditioner
1. Select the Indoor and Outdoor Locations
For a split system air conditioner, pick an indoor location for the internal unit in a high and central position within the room to facilitate optimal air distribution. Leave enough space from the ceiling and walls for proper airflow.
For the outdoor unit, choose a well-ventilated spot that allows for adequate airflow to dissipate heat effectively. Avoid placing it in direct sunlight or near obstructions to prevent overheating.
2. Mount the Indoor Unit
Install the mounting plate onto the wall. First, mark the wall at precise points where the holes will be drilled for perfect alignment with the mounting plate. Drill holes into the marked spots and insert anchors to support the mounting plate.
Once the anchors are in place, attach the mounting plate to the wall using screws or bolts.
3. Drill the Hole for the Piping
Choose the right drill bit: select a bit that matches the diameter of the piping to minimize the risk of damage.
Angle the hole slightly downward for proper drainage. This helps avoid condensation and lets moisture flow away from the indoor unit.
4. Run the Piping and Electrical Connections
Thread the refrigerant pipes through the drilled hole making sure they don’t twist or bend. Once through the hole, connect the pipes to the designated ports on the indoor unit.
Connect the electrical wires to their corresponding terminals on the indoor unit according to the manufacturer’s instructions.
5. Mount the Outdoor Unit
Place the outdoor unit on a stable surface. The surface should be level to prevent vibrations.
Next, connect the refrigerant lines and electrical wires to the outdoor unit according to the manufacturer’s guidelines.
Finally, fasten the unit in place using mounting brackets or anchors to prevent any movement.
6. Charge the Refrigerant and Mount It
Before you can fill the unit with the refrigerant, you need to vacuum the line to remove any air or moisture. Make sure there are no leaks and charge the refrigerant into the system.
As this step requires special equipment, which you may lack, you may need the help of a professional.
7. Final Checks and Testing
Check how the air conditioning system operates. Check all connections for leaks, including the refrigerant and the electrical lines. Then, turn on the system and monitor its performance. Assess its cooling capabilities.
Get Free Estimate!
Request Your Home Comfort Estimate
Schedule AC Installation with Pure Eco Inc
For further information on air conditioner installation services and mini-split systems, reach out to Pure Eco Inc.
In addition to AC installations, we provide a comprehensive range of HVAC services including heating, cooling, indoor air quality improvement, and other services tailored to your needs.
As our Senior Technicians, Eli and Beni explained, the key to a reliable AC installation is doing it right from the very beginning. Proper setup ensures stronger cooling, lower energy bills, and peace of mind knowing your system will serve you for years.
Pure Eco Inc.
We can take care of installation, maintenance, or repair services of your whole HVAC system. Contact us now to schedule a free consultation – (877) 870-7998.
Faq
How do I choose the right air conditioner for my space?
Consider factors such as room size, energy efficiency, and budget before choosing. Window units are ideal for single rooms, while split systems offer better cooling for larger spaces.
What are the differences between window and split system air conditioners?
Window air conditioners are typically installed in a window frame and are great for cooling individual rooms. Split systems consist of separate indoor and outdoor units connected by refrigerant lines and are great for cooling larger areas or multiple rooms. Split systems are often quieter, more energy-efficient, and offer more precise temperature control compared to window units.
Do I need professional help with air conditioner installation?
While DIY installation is possible for some, it’s best to arrange for professional assistance, especially for split systems or central air conditioning units. A professional technician knows how to install all types of AC models and makes and has the necessary equipment.
How do I prepare my space for air conditioner installation?
Clear the installation area of any obstacles so that the window or mounting location is clean and free of debris. Remember to turn off power to the installation area and wear appropriate safety gear.
How long does air conditioner installation take?
It can take from a few hours to a full day. It depends on the type of AC, its location inside the house, the accessibility of the area, and the complexity of the installation. If adjustments and modifications to the space are required, it will be on the higher end of our estimate.