

A Homeowner’s Guide to Installing Batt Insulation Correctly
One of the most straightforward ways to improve your home’s thermal performance is to install batt insulation. Yet, it’s also one of the easiest to get wrong. You see, even small mistakes, such as over-compression, misalignment, or leaving gaps, can significantly reduce efficiency. At Pure Eco Inc., we help homeowners understand how to install insulation batts in attics, walls, and roof assemblies, not so they attempt complicated projects alone, but so they can clearly see what proper batt insulation installation requires and why professional support makes a huge difference in performance.
Batt insulation is widely used in Los Angeles homes because it is accessible and compatible with most framing systems. This guide walks you through the professional process of installing and cutting batt insulation accurately, while working around obstructions, and highlighting the value of expert installation.
Key Takeaways
- Batt insulation works only when it fits perfectly. Even small gaps or compression can cut performance by up to 25%, according to the U.S. Department of Energy.
- Air sealing is essential. ENERGY STAR indicates that sealing leaks before adding insulation can deliver approximately 15% savings on heating and cooling.
- Precision matters more than material. Mineral wool, wood fiber, or fiberglass batts will all underperform if they’re cut or installed poorly.
- Attic performance depends on consistent depth and full loft. Any spot where the insulation is flattened or uneven becomes a cold or hot point that compromises the whole system.
Why Installation Quality Matters More Than Material Choice
When poorly installed, even the best batt insulation will underperform. In fact, the U.S. Department of Energy cannot highlight it enough in its guidance on residential energy efficiency. According to DOE field studies, gaps, compression, and improper cavity fitting can reduce real-world R-value, even when the material itself is rated correctly.
As one Pure Eco Inc. technician often explains during inspections, “Batt insulation fails most often not because of what it’s made of, but because it isn’t fitted, cut, or supported the way the cavity requires.”

A properly fitted batt must touch all six sides of the cavity, avoid compression, and work in tandem with air-sealing measures. When those conditions are met, both fiberglass and mineral wool batts can reach their labeled R-value as expected, which is something many DIY efforts struggle to achieve. This is where professional installation becomes a tangible advantage, especially in older Los Angeles homes that have irregular framing, warped studs, and layers of previous materials that complicate a straightforward DIY approach.
Professional vs. Typical DIY Batt Installation
Aspect | Professional Installation | Typical DIY Outcome |
Fit and coverage | Full-depth, uniform contact with framing | Gaps and compression that reduce R-value |
Cutting batt insulation | Clean, accurate cuts around wiring/pipes | Rough cuts, oversized openings |
Air sealing | Completed before installation | Often skipped |
Safety and clearance | Compliant with Title 24 and fire codes | Risk of contact with heat sources |
Moisture management | Proper ventilation and vapor control | Incorrect barriers that usually trap moisture |
Long-term efficiency | Meets DOE expectations | Low thermal performance |
Types of Batt Insulation
Fiberglass batt insulation
- An industry standard due to low cost and wide availability.
- It can cause skin and lung irritation; it requires protective gear such as a dust mask and safety glasses.
- Vulnerable to over-compression, which reduces the R-value significantly.
- Fibers can cling to clothing and spread throughout the home if not handled with care.
Mineral wool batt insulation
- Known for excellent fire resistance and strong sound-dampening properties.
- Denser and more rigid than fiberglass, which makes it easier to fit snugly in cavities.
- Typically more expensive than fiberglass and requires similar protective equipment.
- Offers higher performance but is still sensitive to improper fitting or compression.
Wood fiber batt insulation
- Increasingly popular among DIY enthusiasts due to its non-irritating, flexible, semi-rigid structure.
- It can be cut cleanly with a simple serrated knife and torn vertically to fit around wiring or irregular cavities.
- Provides excellent acoustical insulation as its dense interlocking fibers absorb sound more effectively than fiberglass.
- Naturally regulates humidity, contributing to healthier indoor environments.
- Arrives carbon-negative and is made from renewable wood industry byproducts.
- Fully recyclable and aligns with sustainable building practices.
Preparing the Area: Air Sealing and Safety Inspections
The key first step – air sealing
There is a great difference between DIY and professional batt insulation installation, and that is the stage of preparation. Professional technicians always begin by sealing air leaks around electrical penetrations, plumbing chases, attic hatches, HVAC openings, and framing joints. Without this step, batt insulation alone cannot prevent heat transfer.
Safety inspections before installation
After sealing, professionals inspect for damage in framing, existing moisture, or unsafe recessed fixtures. These preparations lay the foundation of effective batt insulation, and they are often overlooked in self-made installations.
As one senior technician from the Pure Eco Inc. team puts it: “If you skip air sealing, you’re insulating a house full of leaks.”
How to Cut Batt Insulation Correctly
- Measure the cavity or obstruction accurately.
Use a tape measure to confirm the precise width, height, and depth of the area you’re insulating. Accurate measurement prevents gaps, compression, and thermal weak points. - Place the batt on a flat cutting surface.
Lay the insulation, facing side down, on a clean surface, such as plywood, drywall scrap, or a cutting board, for standard, stable cutting. - Use a straightedge for guidance.
Position a straightedge or T-square over the cutting line to ensure the cut remains straight and prevents material distortion. - Cut with a rigid insulation knife.
Apply steady downward pressure and slice through the batt using long, controlled strokes. Avoid sawing aggressively, which can tear fibers and create uneven edges. - Adjust for wiring.
When wires run across the cavity, split the batt lengthwise so half sits behind the wire and half in front. This way, the coverage will maintain full-depth without compression. - Adjust for pipes or larger obstructions.
Measure the pipe diameter, mark the batt, and cut a channel so the batt wraps around the pipe while retaining its full loft. - Test-fit and refine the edges.
Place the cut batt into the cavity. If edges buckle or compress, trim slightly until the insulation fills the cavity evenly without force.
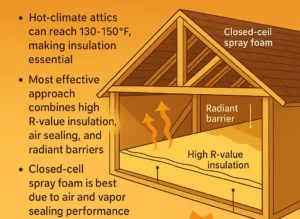
How to Install Insulation Batts in Attics
- Prepare and inspect the attic – Check for air leaks around plumbing penetrations, electrical openings, attic hatches, and framing joints. Seal these before adding insulation. This step is crucial for maintaining R-value and preventing heat loss.
- Clear the joist cavities – Remove debris, old compressed insulation, or materials that may block the joists. Keep in mind that wiring and fixtures should be safe and compliant with local codes.
- Position ventilation baffles where needed – Install baffles at the eaves to maintain airflow from soffit vents. This prevents moisture from accumulating and is a necessary step in Title 24-aligned attic installations.
- Place the batts into the joist cavities – Lay each batt gently between the joists so it rests at full loft. The insulation should touch all sides of the cavity-subfloor, joists, and edges-without being forced or compressed.
- Fit batts end-to-end for continuous coverage – Place batts tightly next to one another. If gaps appear, cut small fill pieces to maintain a seamless thermal layer. Avoid leaving voids, as this can create cold spots.
- Cut and shape batts around obstacles – For wiring, split the batt so half sits behind and half in front of the wire. For pipes or small ducts, cut a clean channel so the batt stays full thickness around the obstruction.
- Maintain clearance around heat sources – Follow fire-safety guidance from the Department of Energy and California Title 24. Keep insulation away from non–IC-rated recessed lights, chimneys, and heat-producing fixtures.
- Inspect the entire attic installation – Check for uniform depth, proper loft, tight edges, and full cavity contact. Re-cut or adjust any areas that appear compressed, uneven, or loosely fitted.
Common DIY Mistakes and When to Call Pure Eco Inc.
Even motivated homeowners run into recurring or unpredictable challenges when installing batt insulation. The most common issues include:
- Skipping air sealing before installing batts. This can result in significant heat loss despite the installation of new insulation.
- Ignoring California Title 24 clearance requirements around recessed lighting and heat sources.
- Failing to maintain ventilation channels can lead to the trapping of moisture while reducing the roof’s lifespan.
- Installing kraft-faced batts in the incorrect orientation causes condensation issues.
- Overlooking damaged or wet existing insulation that results in mold or long-term energy loss.
Pure Eco Inc. technicians frequently note that the majority of insulation failures they encounter are rooted in these avoidable mistakes. As one estimator explains:
“Most of the problems we correct come from good intentions, not bad materials.”
For homeowners who prefer a hands-off approach or want to feel certain that their attic or walls will meet California’s Title 24 standards, professional installation guarantees that every batt is fitted, air-sealed, and inspected for safety. The cost of correcting improper DIY insulation is almost always higher than installing it correctly the first time.
Why Professional Installation Makes the Real Difference
If you want insulation that reaches its rated R-value, keeps your home stable season by season, and lowers your energy use year-round, our team is ready to step in and handle every detail, from start to finish.
If you want your home to stay consistently comfortable and energy-efficient, we’re ready when you are. Pure Eco Inc. can assess your space and create a tailored insulation plan for your needs and budget.
Contact Pure Eco Inc. today.
Frequently Asked Questions
How much batt insulation will I need?
To avoid overspending on excess insulation or underbuying and needing to order more halfway through the project, it’s important to take accurate measurements of your space before you order your insulation. Start by measuring the depth of your framing–whether they’re wall studs, ceiling joists, or rafters–to gauge the thickness of batt insulation you’ll need. Then measure the width between each framing member. Count the number of cavity bays you will need to fill and measure the length of the space that needs insulating. Use these measurements to determine the total square footage you will need to cover. Remember that batt insulation can always be cut or trimmed to fit your unique space.
What’s the difference between installing batt insulation in attics vs. walls?
Attic installations require ventilation baffles, air sealing, and fire-clearance checks. Wall installations require precise cavity fitting and vertical alignment. Each demands a different technique to achieve a full R-value.
Sources