Key Takeaways
- What a crawl space vapor barrier is and how it protects your home.
- The main benefits such as preventing mold, pests, and wood rot.
- When it’s the right time to install one, and how to spot moisture problems.
- A clear step-by-step guide to installing a vapor barrier in a crawl space.
- The difference between a simple vapor barrier vs. full encapsulation.
- How to maintain your barrier for long-term protection.
- Answers to the most common homeowner questions about crawl space vapor barrier installation.
Understanding Crawl Space Vapor Barriers: What They Are and How They Work
A vapor barrier is a plastic sheet installed in your crawl space to block moisture from rising up into your home. It helps prevent dampness from damaging your home’s foundation, wood, and insulation. At Pure Eco, we explain it simply: a vapor barrier keeps your home dry, safe, and healthier.
Vapor barriers are essential for keeping your home dry. They reduce the risk of mold, mildew, and pests, which can harm both your home and health. By controlling moisture, a vapor barrier also helps lower energy costs and protect your home’s structural integrity. We asked our senior HVAC specialist, and he said: “A well-installed vapor barrier can add 15–20 years of protection to a home and make the air inside much healthier.” – Beni, Senior Technician.
Get Free Estimate!
Request Your Home Comfort Estimate
Benefits of Installing a Vapor Barrier in Your Crawl Space
A vapor barrier can protect your home in many ways. First, it helps prevent structural damage. By stopping moisture from getting into the crawl space, it prevents wood rot and damage to your home’s foundation.
It also reduces the risk of mold and mildew. These can cause health problems and damage your property, but a vapor barrier keeps moisture away, stopping mold growth.
Another benefit is energy efficiency. With a vapor barrier in place, your home will stay warmer in winter and cooler in summer, reducing your heating and cooling costs.
Lastly, a vapor barrier helps keep pests out. Moisture in the crawl space can attract rodents and insects, but a dry space makes it less inviting for them to enter your home.
Our experts advise: “If you notice musty odors, damp soil, or insects near your crawl space, a vapor barrier is often the first solution we recommend.”
When Do You Need to Install a Vapor Barrier?
If you notice signs of excess moisture in your crawl space, it might be time to install a vapor barrier. Musty odors, visible mold, or damp areas are common indicators that moisture is a problem. These signs suggest that your crawl space is too humid, which could lead to more serious issues like mold growth or wood damage.
If you’re unsure about the condition of your crawl space or if the moisture problems persist, it’s a good idea to consult a specialist. A professional can assess the situation and recommend the best solution, whether it’s installing a vapor barrier or addressing other moisture-related concerns.
If you’re not sure, call Pure Eco for an inspection. Our team will check the moisture levels and give you clear advice on whether a barrier alone is enough or if your home needs full encapsulation.
Get Free Estimate!
Request Your Home Comfort Estimate
Preparation Checklist for Installing a Crawl Space Vapor Barrier
Before installing a vapor barrier, it’s important to assess the moisture and mold levels in your crawl space. Look for signs of dampness or mold growth. If mold is present, it should be cleaned and treated before installing the barrier to prevent further issues.
Next, seal any ventilation points in the crawl space. This helps reduce moisture entry by limiting airflow. You can close vents and use proper sealing materials to keep moisture out.
Improving the drainage and grading around your home is also crucial. Make sure that water flows away from the foundation. This reduces the chance of water building up around your crawl space, which can lead to moisture problems. Proper drainage helps keep the area dry and protects your home.
At Pure Eco, we always prepare carefully before installing:
- Check for mold and moisture
- Seal vents and cracks
- Fix drainage so water flows away from your home

Essential Tools and Materials for Vapor Barrier Installation
To install a vapor barrier in your crawl space, you’ll need some basic tools. Essential equipment includes strong tape to secure the barrier, a utility knife for cutting the material, and measuring tools to ensure accurate placement. Gloves and safety glasses are also recommended to protect yourself during the installation.
Choosing the right materials is important for a lasting vapor barrier. Look for thick plastic sheeting designed for moisture control. Thicker barriers (like 10 to 20 mil) are more effective and durable. The quality of these materials makes a big difference in how well your vapor barrier will protect your crawl space from moisture.
Our experts recommend 10–20 mil reinforced plastic sheeting. It lasts longer and gives stronger protection than thin 6 mil plastic.
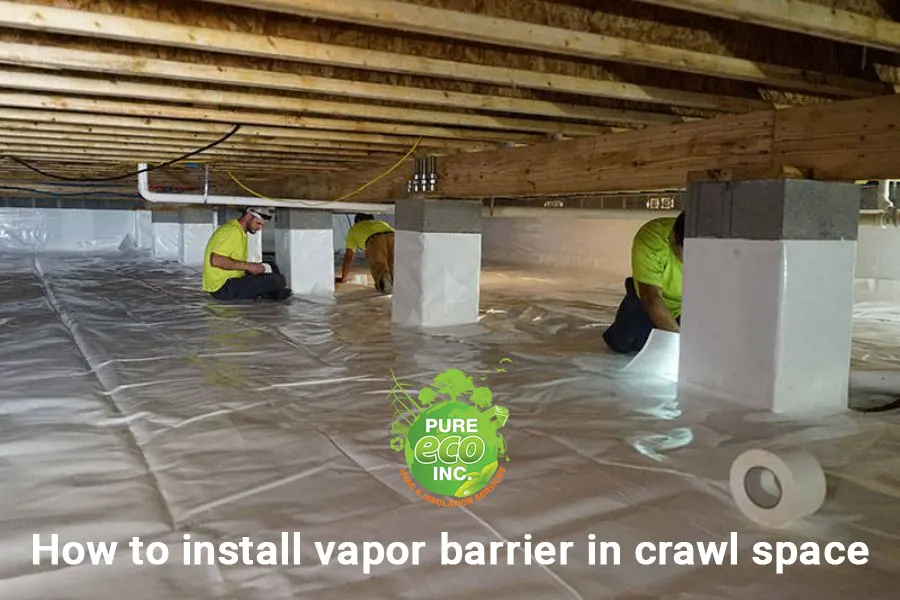
How to Install a Crawl Space Vapor Barrier: Step-by-Step Instructions
We’ll guide you through each step to help you avoid common mistakes and stay in control of the process. With these tips, you can ensure a successful and effective vapor barrier installation for your crawl space.
Step 1. Accessing and Preparing the Crawl Space
Start by carefully entering the crawl space, keeping safety in mind. Wear protective gear like gloves, a mask, and knee pads to protect yourself from debris and dust.
Step 2. Clearing Out and Cleaning the Space
Remove any debris, old insulation, or other materials. It’s important to work on a clean surface to make the vapor barrier more effective. Use fans or a dehumidifier to dry out any moisture, ensuring a dry space before installation.
Step 3. Leveling the Crawl Space Floor
If the ground is uneven, try to level it out for a smooth installation. A level floor helps the barrier fit properly and stay in place.
Step 4. Cutting and Laying Out Vapor Barrier Sheets
Measure the crawl space and cut the vapor barrier sheets to fit. Accurate measurements will help you avoid gaps and ensure full coverage.
Step 5. Securing the Vapor Barrier to Surfaces
Lay the barrier across the floor and attach it to walls and support piers using heavy-duty tape or adhesive. This keeps the barrier stable and prevents it from moving.
Step 6. Sealing Seams and Edges for Full Coverage
Seal all seams and edges with tape or adhesive to prevent moisture from leaking through. Make sure each section is tightly secured.
Step 7. Inspecting the Barrier and Making Adjustments
Check the barrier for any gaps or loose areas. Adjust or re-tape any spots that need extra coverage to keep the barrier fully sealed.
Step 8. Conditioning the Crawl Space Air (Optional)
To improve air quality, you can use a ventilation fan or dehumidifier. This optional step can help keep the air in your crawl space fresh and reduce overall moisture.
At Pure Eco, our technicians also use termination bars on walls for extra strength and long-lasting sealing.
Get Free Estimate!
Request Your Home Comfort Estimate
Moisture Problems in Crawl Spaces – Common Issues and Their Consequences
Moisture in your crawl space can cause serious problems. One of the biggest issues is mold and mildew growth. When moisture is left unchecked, mold and mildew can form, which harms indoor air quality and can cause health issues like allergies or breathing problems.
Another problem is wood decay. When wooden supports in your crawl space stay wet for too long, they can rot. This weakens the structure of your home and can be expensive to fix.
Moisture also attracts pests. Rodents, insects, and other pests love damp environments. They can cause damage to your home and even spread diseases. Keeping your crawl space dry helps keep these unwanted visitors away.
Choosing Between Vapor Barriers and Full Encapsulation
When deciding between a vapor barrier and full encapsulation, it’s important to consider both the benefits and costs. A vapor barrier alone is often enough to reduce moisture for homes with mild dampness issues, making it a more budget-friendly option. However, full encapsulation, which seals the entire crawl space, is recommended if your home has severe moisture problems.
Encapsulation provides stronger protection by fully enclosing the space, which helps control moisture, improves air quality, and offers greater energy efficiency. For serious moisture issues, investing in full encapsulation can be a better long-term solution.
Our experts advise: “If your crawl space has standing water or strong odors, encapsulation is the safer long-term solution.”
Maintaining Your Crawl Space Vapor Barrier
Regular maintenance of your vapor barrier is key to keeping it effective. Check the barrier every few months for any signs of wear, such as small tears or loose areas. Look for moisture spots or any visible damage that may need repair.
If you find minor issues, address them promptly by patching small tears with waterproof tape to prevent moisture from getting in. Also, maintaining proper ventilation helps keep the crawl space dry. Using a dehumidifier or ensuring good airflow can help extend the life of your vapor barrier.
At Pure Eco, we recommend checking your crawl space twice a year, in spring and before winter, to catch problems early. Protect your home from moisture damage with a vapor barrier expert! Contact Pure Eco Inc. today for professional guidance on vapor barrier installation and crawl space encapsulation – (877) 607-9021!
Get Free Estimate!
Request Your Home Comfort Estimate
What People Are Saying About Our Service
A missing or poorly installed vapor barrier can lead to serious crawl space problems like moisture buildup, mold, wood rot, pest infestations, damaged insulation, and higher energy bills. Proper installation involves clearing debris, leveling the ground, using thick polyethylene sheeting, overlapping and sealing seams, and ensuring full coverage up walls and around piers. Signs you may need a new barrier include rips, musty odors, condensation, pooling water, pests, or sagging insulation. To avoid issues, never use thin plastic, leave gaps, skip sealing walls, or ignore drainage problems—quality installation is key to protecting your home’s structure, air quality, and energy efficiency.
Eli, Senior Technician at Pure Eco Inc.
Faq
What are the main benefits of installing a vapor barrier?
Installing a vapor barrier in your crawl space helps prevent moisture damage, reduces the risk of mold growth, improves indoor air quality, and increases your home’s energy efficiency by minimizing heat loss through the floor.
Do I need special tools to install a vapor barrier?
For a basic installation, you’ll need tools like a utility knife, measuring tape, and waterproof tape. For a thorough job, consider adding a dehumidifier, fans for drying, and materials to seal crawl space vents.
How thick should the vapor barrier be?
A thickness of 10-20 mils is generally recommended for durability and long-term moisture protection. Thicker materials offer better resistance to tears and provide greater insulation.
What preparation steps are needed before Installation?
Ensure the crawl space is dry, clean, and free of debris. This might involve using fans or a dehumidifier, cleaning up any loose dirt, and checking for mold. Sealing any ventilation points and improving drainage outside can also help control moisture levels.
How do I know If I need professional Installation?
If your crawl space has severe moisture problems, mold, or structural issues, professional installation is advised. A professional can assess the situation and ensure the vapor barrier is properly installed to prevent further moisture buildup. Contact Pure Eco Inc. today to schedule an expert consultation and get the best solution for your crawl space needs.
How long will installation take?
For a DIY project, installing a vapor barrier may take one to two days, depending on the crawl space size and your experience level. A professional installation can usually be completed within a day, ensuring proper setup and coverage.
How long will a vapor barrier last?
With proper installation and maintenance, a vapor barrier can last 10 to 20 years. Regular inspections and prompt repairs of any damage will help extend its lifespan.
Can a vapor barrier be installed in any crawl space?
Yes, a vapor barrier can be installed in most crawl spaces. However, the space should be accessible, clean, and dry before installation. For extremely tight or complex areas, a professional may be better suited to handle the installation.


