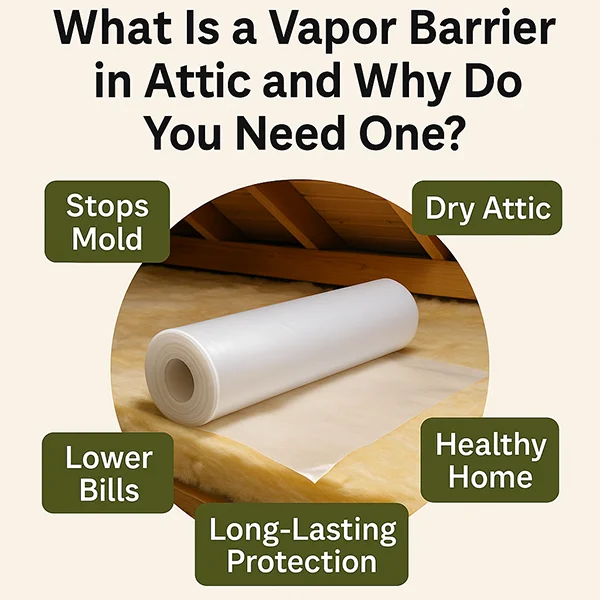
A vapor barrier in the attic is a special layer that helps control moisture. It keeps warm, wet air from moving into the cold attic, where it can turn into water. In this guide, you will learn what a vapor barrier is, when you need it, and how to install it step by step.
Key Takeaway
By reading this article, you will learn:
- What a vapor barrier in attic is and why it protects your home from moisture, mold, and damaged insulation.
- When to install a vapor barrier in attic and how climate, attic design, and building codes affect the choice.
- The types of vapor barrier for attic, their cost, and which material works best for your home.
- How to install vapor barrier in attic step by step, plus the most common mistakes to avoid.
- Alternative strategies like air sealing, ventilation, and vapor retarders that also help control moisture.
- How to inspect and maintain a vapor barrier in attic for long-term protection and energy savings.
With this knowledge, you can make the right decision about installing a vapor barrier in attic.
What Is a Vapor Barrier for Attic and Why Do You Need One?
A vapor barrier (VB) is a thin layer of material, like plastic or a special coating, that slows down how water vapor moves through walls, ceilings, or floors. Think of it as a shield that protects your home from unwanted moisture.
In the attic, a vapor barrier is very important. It helps keep moisture under control, so you avoid mold, wood rot, and damage to your insulation. When insulation stays dry, it works better, and that means your home will use less energy to stay warm or cool.
The need for a vapor barrier also depends on where you live and the rules in your area. In colder climates, building codes often require one, while in hot or humid areas, it may not be needed or may be installed in a different way. The type of roof or ceiling construction also changes how and where the barrier should be placed.
“In many homes, the attic is the first place where moisture causes trouble. A well-installed vapor barrier in the attic keeps insulation dry and stops mold before it starts. At Pure Eco Inc, we always check the climate and attic design to choose the best solution for each home.” – Pure Eco Inc., Insulation & Energy Efficiency Experts
Understanding Moisture and Vapor Barrier in Attic Basics
Moisture is always moving inside a house, even if we cannot see it. Warm air holds more water, and when it touches a cold surface, the water turns into drops. This process is called condensation. The main forces that move vapor are temperature, humidity, and pressure.
It is also important to know the difference between air leaks and vapor diffusion.
- Air leaks happen when warm air escapes through cracks around lights, pipes, or attic hatches. This moves a lot of moisture very quickly.
- Vapor diffusion is slower. It happens when water vapor passes through building materials like drywall or insulation.
Good attic ventilation helps control both problems. Soffit vents let fresh air in, ridge vents let hot and wet air out, and together they keep the attic dry.
Finally, the type of insulation matters too:
- Fiberglass, batts – easy to install, but allow vapor to pass.
- Blown-in insulation – good coverage, but still not a vapor barrier.
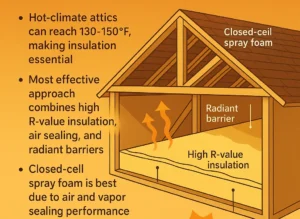
- Spray foam – works as both insulation and vapor barrier if closed-cell type.
- Rigid foam boards – can slow vapor movement and add insulation strength.
When a Vapor Barrier is Necessary in an Attic
A vapor barrier is not always needed in every attic. The decision depends on several things. Climate is one of the most important factors. In cold areas, warm indoor air rises and meets the cold attic surface, which can create condensation. In these homes, a vapor barrier is often the best way to stop moisture problems. In hot or humid climates, the situation is different. A full vapor barrier can sometimes trap water instead of stopping it, and this can lead to mold or wood damage.
The design of the attic also plays a big role. A ventilated attic allows fresh air to move through and carry away moisture, so a lighter solution, such as a vapor retarde,r may be enough. In an unvented attic, where there is no airflow, a stronger barrier or spray foam system is usually needed. Insulation is another point to check. If the insulation is thin or not sealed well, a vapor barrier can help keep it dry and working better.
Moisture sources inside the home must also be considered. Bathrooms, kitchens, laundry rooms, or ducts under the attic can all send more water vapor upward, making extra protection important. Finally, local building codes give clear rules for each area. Some codes require a vapor barrier in attics, while others only suggest a vapor retarder depending on the climate and roof design.
An expert from Pure Eco Inc explains: “The need for a vapor barrier in attic always depends on climate, design, and moisture sources. In cold places, it protects the home from condensation. In hot and humid areas, the wrong barrier can trap water and cause damage.”
Types of Vapor Barrier Materials & Their Properties
Homeowners can choose from different types of vapor barrier materials, and each one works in a different way. The most common option is plastic sheeting, often made of polyethylene. It is low in cost, easy to buy, and comes in different thicknesses. The thicker the sheet, the stronger the barrier. The key point is the perm rating, which shows how much vapor can pass through. Lower numbers mean stronger protection.
Another option is vapor barrier paint or coating. This can be rolled or sprayed on walls or ceilings. It is simple to use in finished spaces where plastic sheets cannot be added. While not as strong as plastic, it can still slow down vapor movement.
Closed-cell spray foam and rigid foam boards give two benefits in one. They insulate and act as a vapor barrier at the same time. They are more expensive, but they are very effective and long-lasting. Foam also helps seal cracks and air leaks.
Some modern homes use specialty membranes. These are flexible sheets designed to allow a small amount of vapor to pass. This makes them safer in climates where a full barrier could trap moisture.
Comparison of Vapor Barrier Materials
| Material | Cost | Ease of Installation | Durability | Perm Rating | Risk of Moisture Trap |
| Plastic sheeting (polyethylene) | Low | Easy, but needs sealing | Medium | Very low (strong barrier) | High if installed on the wrong side |
| Vapor barrier paint/coating | Low–Medium | Very easy | Medium | Moderate | Lower risk, but not as strong |
| Closed-cell spray foam | High | Needs professional install | Very high | Very low | Low if installed correctly |
| Rigid foam boards | Medium–High | Medium, some cutting | High | Low | Medium, depends on sealing |
| Specialty membranes | High | Medium | High | Variable (allows some vapor) | Very low, safer in humid climates |
How to Install a Vapor Barrier in an Attic – Step by Step
As a technician with many years of experience, I can say that installing a vapor barrier in the attic is not only about rolling out plastic. It is about planning, sealing, and placing it in the right way for your attic design. Here is how the process works.
Preparation is always the first step. Before we install anything, we check the attic for signs of moisture, roof leaks, and poor ventilation. We also look at the condition of the insulation. If there are air leaks around lights, pipes, or wiring, we seal them first. This is very important, because air leaks can move more moisture than vapor diffusion itself.
Next is choosing the placement. In most ventilated attics, the vapor barrier goes on the warm side, just above the ceiling drywall and under the insulation. In unvented or conditioned attics, the barrier can be part of the roof deck or installed together with spray foam. The correct side depends on the climate and attic design.
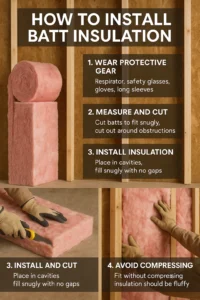
For materials and tools, we prepare the vapor barrier material, strong tape, staples or fasteners, a utility knife, and safety equipment like gloves and glasses. Sometimes we also use a moisture meter to check problem areas.
Now comes the installation. We always start with a clean and dry surface. Then we roll out the barrier, laying it smoothly across the ceiling drywall or over the insulation, depending on the design. Each sheet must overlap at least six inches, and all seams and edges are sealed with tape or a special sealant. Around wires, pipes, and attic hatches, we cut carefully and seal every opening so the barrier is continuous with no gaps.
There are also special considerations. Electrical boxes must be safe for contact with insulation (IC-rated). Lights, attic doors, and ducts need extra sealing so no moisture escapes. In homes with cathedral or vaulted ceilings, the barrier may be installed against the roof deck instead of the attic floor.
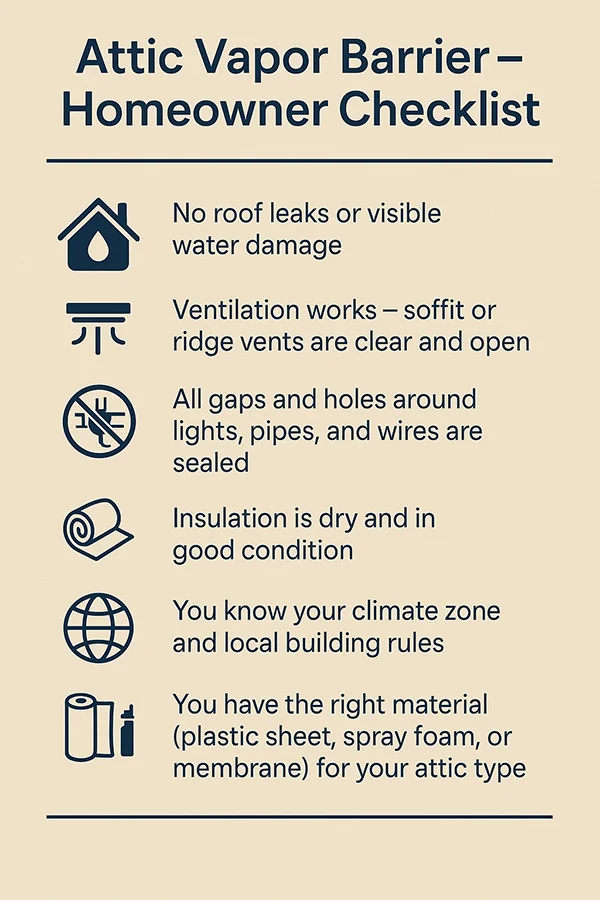
Before installing a vapor barrier, make sure these points are checked:
- The attic has no roof leaks or visible water damage.
- Ventilation works – soffit or ridge vents are clear and open.
- All gaps and holes around lights, pipes, and wires are sealed.
- Insulation is dry and in good condition.
- You know your climate zone and local building rules.
- You have the right material (plastic sheet, spray foam, or membrane) for your attic type.
“A vapor barrier only works if it is fully sealed. Even one small hole around a pipe can let in enough moisture to damage the whole attic.” – Beni, Senior Technician, Pure Eco Inc.
Common Vapor Barrier in Attic Mistakes and How to Avoid Them
When installing a vapor barrier in the attic, many homeowners make small mistakes that can cause big problems later. One of the most common is putting the barrier on the wrong side. The vapor barrier should be placed on the warm side of the insulation. If it is on the cold side, moisture can collect and lead to mold or rot.
Another mistake is missing penetrations. Holes around lights, pipes, or wires may look small, but they let a lot of moisture through. Every gap must be sealed carefully. It is also important to choose the right perm rating for your climate. In warm and humid areas, a barrier that is too strong can trap water inside the structure. This makes things worse instead of better.
Some people also make the error of blocking attic ventilation by covering vents with insulation or the barrier itself. Ventilation must always stay open in a ventilated attic. Other mistakes include using poor overlap or cheap tape that fails over time, or ignoring local building codes and climate conditions. These rules exist to make sure your home stays safe and dry.
“A vapor barrier in the attic will only work if it is installed the right way. Small mistakes like sealing the wrong side or blocking vents can create more damage than protection.” – Beni, Senior Technician, Pure Eco Inc.
Alternative and Supplemental Strategies for Vapor Barrier in Attic
A vapor barrier is only one part of keeping an attic dry. In many homes, air sealing is even more important. Small leaks around lights, pipes, and attic hatches can move large amounts of moisture into the attic. Sealing these leaks often makes a bigger difference than adding a barrier alone.
Another option is to use a vapor retarder instead of a full vapor barrier. A retarder slows down vapor but still lets a little pass through. This is safer in mixed or humid climates because it lowers the risk of trapped moisture. Some materials, like closed-cell spray foam or rigid foam boards, can work as both insulation and a vapor barrier. These give strong protection but usually cost more.
Good attic ventilation is also a key strategy. Soffit vents bring in fresh air, ridge or roof vents let hot and wet air escape, and together they keep the attic balanced. Without ventilation, even the best vapor barrier can fail.
Vapor Barrier in Attic: Codes, Standards, and Climate Considerations
Building codes are different in every region, and they often decide if a vapor barrier or retarder is required. In cold climates, codes usually ask for a vapor barrier on the warm side of the insulation to stop condensation. In mixed or hot-humid climates, codes may suggest only a vapor retarder or no barrier at all.
The strength of a vapor barrier is measured by its perm rating. A low perm rating means very little vapor can pass through. A higher rating lets more vapor move. Choosing the right rating is important, because a barrier that is too strong in a humid climate can trap water inside the structure.
Best practices often come from sources like Building Science Institute, ASHRAE, and local building departments. Following these guidelines makes sure the attic stays safe, energy-efficient, and in line with legal rules.
Cost & ROI: Is It Worth Installing a Vapor Barrier in Attic?
Many homeowners want to know if a vapor barrier in the attic is worth the money. From my experience, the answer is yes in most cases, because the long-term savings are bigger than the cost.
- Cost of materials and labor – Plastic sheeting is low in price and good for DIY. Spray foam or rigid foam boards cost more and often need a professional.
- Energy savings – A dry attic means insulation works better. This lowers heating and cooling bills every month.
- Avoiding repairs – By stopping moisture and mold, you save money on fixing wood damage, roof problems, or replacing insulation.
- Lifespan vs. risk – Good vapor barrier materials last for many years. The cost of not having one can be much higher if moisture destroys your attic.
“The real value of a vapor barrier in attic is not just lower bills, but also fewer repairs.” – Beni, Senior Technician, Pure Eco Inc.
Inspection, Maintenance & Troubleshooting of Attic Vapor Barrier
Even a well-installed vapor barrier needs care. I always tell homeowners to check it at least once a year. Look for wet spots, stains, or mold on the ceiling or insulation. These are signs that moisture is still moving into the attic.
If the vapor barrier is failing, you may see peeling tape, holes around pipes or wires, or damp insulation. In this case, the solution is to repair seams, add new sealing, or even retrofit with a stronger material.
Improving attic ventilation is also part of maintenance. Open vents keep the attic dry and reduce stress on the barrier.
Average Cost of Vapor Barrier in Attic
| Material Type | DIY or Professional | Cost per sq. ft. (approx.) | Notes on Value |
| Plastic sheeting (polyethylene) | DIY or Pro | $0.10 – $0.50 | Low cost, good for basic protection, needs careful sealing |
| Vapor barrier paint/coating | DIY | $0.50 – $1.00 | Easy to apply, medium strength, good for small spaces |
| Rigid foam boards | Pro recommended | $1.50 – $2.50 | Works as insulation + barrier, durable, higher upfront cost |
| Closed-cell spray foam | Professional only | $2.00 – $3.50 | Best performance, seals air leaks, very long-lasting |
Protect Your Home with Expert Vapor Barrier Installation
Moisture problems in the attic can lead to high bills, mold, and costly repairs. A well-installed vapor barrier gives long-lasting protection, but only if it is done the right way for your climate and attic design.
Don’t take risks with your home. Contact Pure Eco Inc today for a free attic inspection and professional advice on the best vapor barrier solution. Our experts make sure your attic stays dry, your insulation works at full power, and your home stays safe and energy-efficient for years to come.
Sources
https://www.finehomebuilding.com/forum/attic-add-vapour-barrier-or-not
FAQ
Should I Add a Vapor Barrier in My Attic?
It depends on your climate, attic design, and local building codes. In cold climates, a vapor barrier is often required. In hot or humid areas, adding the wrong barrier can trap moisture and cause damage.
Does Blown-In Insulation Need a Vapor Barrier?
Yes, in many climates it does. Blown-in insulation does not stop vapor by itself. A vapor barrier or retarder is usually added under it to keep insulation dry and effective.
Is Installing a Vapor Barrier Optional or Mandatory by Code?
Building codes are different in each region. Some areas require a vapor barrier on the warm side of attic insulation, while others only suggest a vapor retarder or no barrier at all. Always check local codes before starting.
Where Should the Vapor Barrier Be Placed in the Attic?
In most ventilated attics, the vapor barrier goes on the warm side, just above the ceiling drywall and under the insulation. In unvented attics, it may be applied to the roof deck or combined with spray foam.
Can a Vapor Barrier Cause Problems in the Attic?
Yes, if installed on the wrong side or in the wrong climate, it can trap moisture instead of stopping it. This can lead to mold, rot, and poor insulation performance.
What Materials Can Be Used for Vapor Barrier in Attic?
Common options include plastic sheeting, vapor barrier paint, closed-cell spray foam, rigid foam boards, and specialty membranes. The right choice depends on budget, attic type, and climate